Macrame is super cool and has been a big hit in the DIY scene for a long time. Those funky knots and patterns end up looking like amazing, boho-style pieces that make any space feel cozy and handmade. Among these, the macrame rainbow is seriously catching everyone’s eye. So, if you’re thinking of adding some flair to your ba’s room, giving your living room a makeover, or just in the mood for a fun DIY session, whipping up a macrame rainbow DIY is a surefire way to splash in some color and charm. In this guide, I’m gonna show you what stuff you need and give you a step--step on making your own macrame rainbow.
Materials Needed to Make a Macrame Rainbow DIY
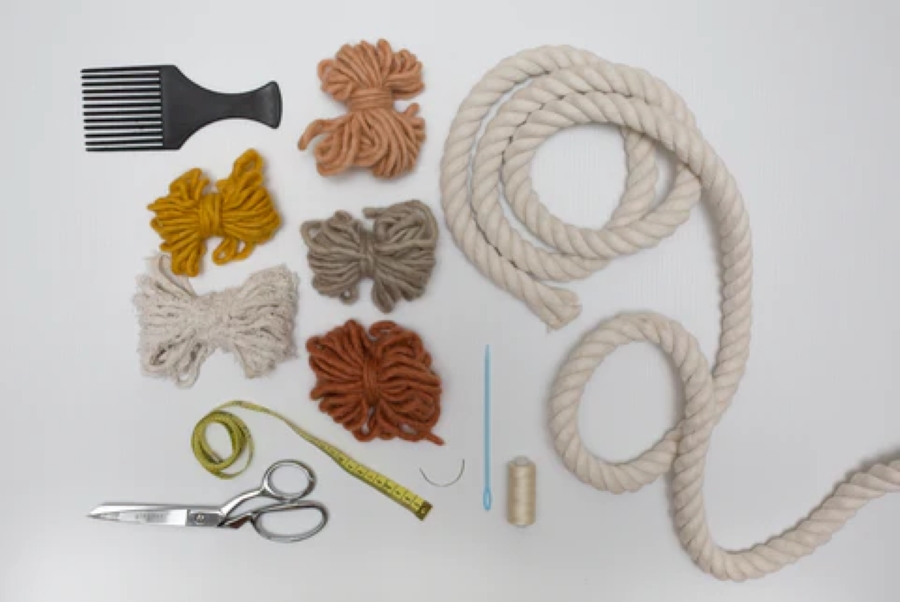
Making a macrame rainbow DIY is super fun and kinda relaxing. But like all DIY stuff, you’ve gotta start with the right materials. I’ve taken the original list and added a few of my own two cents to make sure you’ve got everything. Doesn’t matter if you’re a DIY pro or a newbie, I’ve got your back.

1. Twisted Cotton Rope (20mm thick): Kick off with about 2.4 meters of this. It’s sturdy and gives our rainbow a nice, full look. But if you wanna mix things up with different thicknesses, go for it!
- For the Rope: 64cm (outermost curve – 56cm – 48cm – 40cm – 34cm (innermost curve)
2. Art Yarn or Single Strand Macrame Cotton: You’ll need around 80 meters of this stuff. I’m personally all about Art Yarn because it’s super soft and makes the rainbow look kinda dreamy. But if you’ve got some single strand macrame cotton lying around, that works too. This yarn’s gonna wrap around our rope to give the rainbow its groovy texture.
- For the Yarn: 14m (outermost curve) – 13m – 12m – 11m – 10m (innermost curve)
3. Measuring Stuff: A tape measure is key! Gotta make sure you’re getting everything just the right size.
4. Scissors: To snip your rope and yarn to the perfect length.
5. Big Eye Needle and Maybe a Curved Needle: The big eye needle is for threading that thick yarn. The curved needle is cool to have, but if you’ve got a long one already, you’re good to go.
6. Sewing Thread: We’ll use this to tie together different parts of our rainbow.
7. Comb: This guy’s for fluffing out the ends of the rainbow, so it looks like clouds.
With these materials at your disposal, you’re all set to craft a macrame rainbow that reflects your unique touch.
Steps on How to Make a Macrame Rainbow DIY
Making a macrame rainbow DIY isn’t just about tying some stuff together – it’s mixing your creative vibes with a splash of patience. The first time I crafted one, it was as chill as it was artsy. If you’re itching to get started, I’ve got your back with these steps, sprinkled with some tips from my own DIY adventures:
1. Yarn Meets Rope

- Kick off with the fibres for your biggest rainbow curve.
- I always give it about a thumb’s width (2cm) from the rope’s end before tying the yarn. Pop on an overhand knot, making sure the little tail-end points back down the rope. It’s our sneaky trick for a smooth finish later.
2. Wrap That Yarn!

- Get a good grip on the yarn and start twirling it around the rope. You’ll wanna cover that starting tail of yarn completely. Honestly, wrapping neatly and consistently is the secret sauce to it looking pro.
- Keep wrapping down the rope but hit the brakes about 2cm from the end.
- Slide the yarn through that big-eye needle of yours. Stitch back into the last bit you wrapped. Doing this three times is my magic number for making sure it stays put.
- To hide any loose ends, I sneak the needle and yarn under the rainbow curve for about 3-4cm. After that, snip off any extra bits hanging around.
3. Get That Rainbow Arc Just Right

- Carefully bend that wrapped curve to look all rainbow-y. If you spot the starting knot or a cut yarn bit, no stress. That’s gonna be our rainbow’s backside, hidden away from prying eyes.
- Rinse and repeat for all five curves. Once they’re all wrapped up, I lay ’em out and give ’em a little nudge here and there to make sure they gel together.
- Super important: work on the back side so the front looks all pretty and neat.
- Grab a curved needle (seriously, it’s the MVP for this) and some cotton thread. Stitch each rainbow bit to its buddy. You want ’em to be real close pals, so pull those stitches tight.
- If you’re fresh out of curved needles, any ol’ needle will do the trick, but trust me, curved is the way to go.
4. Add Some Pizzazz

- This bit’s super fun! Take a comb and fluff out the exposed rope at the bottom of the rainbow, aiming for a cloud-like vibe. Once it’s all poofy, give it a trim to look fab.
- Wanna show off your rainbow on a wall? Think about stitching a small ring on the back. It’s a neat way to hang it up.
Dive in and weave a bond! Discover easy 9-step instructions for Macrame Friendship Bracelets now.
What Can You Do With a Macrame Rainbow DIY?
They’re kinda all the rage in the DIY world right now, and man, I get it. They’re super adaptable, have this cool texture thing going on, and come in poppin’ colors that fit just about anywhere. I’ve been playing around with these, trying out new stuff, and here’s what I’ve got:

- Wall Hangings: The OG way to show off a macrame rainbow DIY? Slap it on a wall. Bedroom, lounge, or even that tiny corner with all the books – these bad boys add instant cozy vibes.
- Garland Delight: Why stop at one when you can have a whole bunch? Line a few up to make a wicked garland, perfect for parties or just jazzing up your patio.
- Ba Mobile Magic: Pop one of these on a ba mobile, and boom! Magic. They’re colorful, tactile, and let’s be real, they’ll make any crib look ten times cooler.
- The Petite Keychain: Ever thought of shrinking the rainbow down? Tiny macrame rainbow DIY make killer keychains. Add a little loop, and you’ve got a rad gift. Every time your buds grab their keys, they’ll get a little DIY love from ya.
- Bookmark Beauty: Feeling extra? Make a slim rainbow and use it as a bookmark. For those of us who’re into books, this is the dream.
- Jewelry with a Twist: If you’re all about making a statement, try turning that macrame rainbow into some dope earrings or a necklace. Talk about boho glam.
So there you go, from jazzing up your space to flaunting it on you, macrame rainbow DIY is the bomb. They’re not just about looking cute; they’re about letting that creative flag fly high.
With the tips and tricks we’ve shared on Linlin Macrame, you’re now equipped to create, care for, and show off your boho-inspired coasters. Embrace the art, and let your creative juices flow!