Ever spotted those cool woven keychains that give off major boho vibes? Yup, me too! They’re not just some random trendy thing; macrame’s been around for ages. Lately, it’s made a comeback, and guess what’s an awesome piece to start with? If you’re anything like me and can’t wait to give macrame a go, starting with a keychain DIY is spot on. In this blog, I’m gonna walk you through the wild ride of macrame keychain DIY. Let’s dive into the knots, the whole how-to, and the absolute fun of making your own macrame keychain.
What Types Of Knots Are Used In Macrame Keychain DIY?
With macrame, it’s all about the knots. Those swirly patterns, crafted talented fingers, can seriously draw you in. But when I started making macrame keychain diy, I realized that while the knots look fancy, they’re actually not that hard. You just need a little patience and some practice. Here’s a lowdown on the knots I rocked for my keychain:
1. Lark’s Head Knot
You use this ba to hook your cord onto stuff like sticks, hoops, or even another bit of cord. Here’s my take on nailing a forward-facing Lark’s Head knot:
Steps to Make a Lark’s Head Knot:

- First, decide how long you want your cord and chop it. Then, fold that bad boy in half.
- Pop the folded loop in front of whatever you’re attaching to (like a stick or hoop) and loop it around the back.
- With your loop hanging down, yank the cord ends through.
- Now, give those ends a good tug to lock in your knot, making sure they hang at the same length.
2. Diagonal Double Half Hitch Knot
After getting things started with the Lark’s Head knot, I jumped right into the diagonal double half hitch knots. These bad boys create some awesome patterns when you line ’em up in rows, and you can play around to get different angles and shapes.
Steps to Tie a Diagonal Double Half-Hitch Knot:

- Start with a cord hanging vertically and another one going diagonally.
- Grab the first one and tie two half-hitch knots.
- Do the same thing with the rest of the cords.
- Make sure you pull each knot tight to get those raised bars looking sharp.
3. Wrapping Knot
To make my macrame keychain diy look super sleek, I whipped out the wrapping knot. This knot’s super handy and you can use it at the start or finish of your macrame masterpiece.
Getting the Wrapping Knot Done:

- First, gather up the cords you wanna bundle and pick another one to work with.
- Bend one end of that cord and place it next to the bunch you’re wrapping up.
- Now, using the longer end, start wrapping it around all the cords. Yep, that includes the bunch and the cord you’re working with.
- Keep going until you only see a tiny bit of the bent cord. Then, poke the long end through that little loop.
- Pull on the top part, which will hide the loop under your wraps. Chop off any extra bits from both ends.
Jumping into this whole macrame thing, I realized it’s not just about the final piece but the journey, too. Making each knot, feeling the cord, and seeing it all come together was epic. So, if you’re thinking of diving into macrame, seriously, just go for it!
How to Make a Macrame Keychain DIY
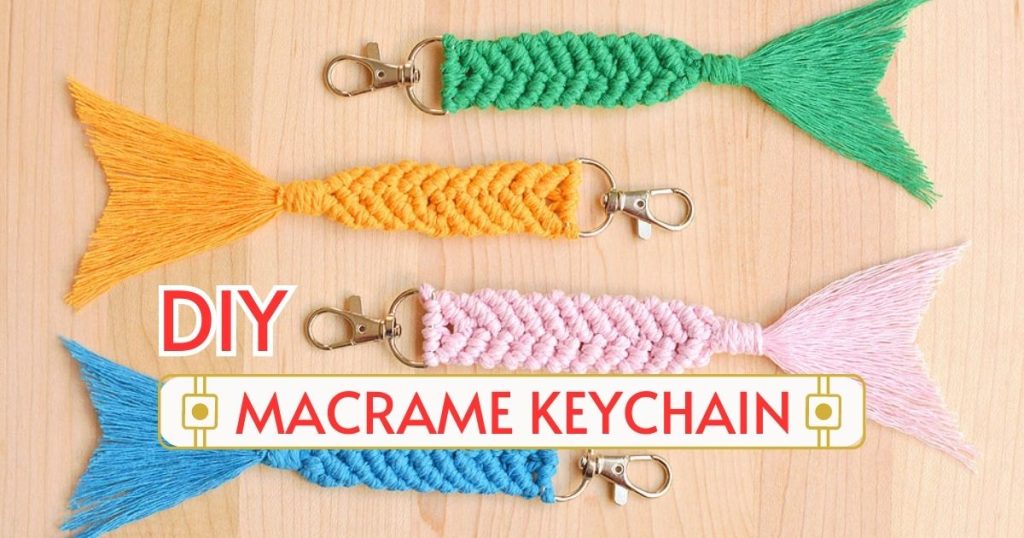
So, not too long ago, I stumbled on this cool project that’s like a combo of easy-peasy and straight-up magic: the mermaid tail macrame keychain. This keychain isn’t just easy on the eyes; it’s also perfect for macrame newbies like me. If you’re itching to craft your own snazzy macrame accessory, here’s how I made mine:
Materials and Tools Needed:

- That keychain clippy thing
- 164 inches of Macrame cord (I went with the 2 mm size, works like a charm)
- Tape measure
- Scissors
- Tape (to keep things from wobbling around)
- A comb or one of those pet brushes
Step--Step Instructions:
1. Cutting and Attaching the Cord:

I measured and snipped one 20-inch piece and three 48-inch pieces of macrame cord. To keep things steady, I taped the keychain clasp to my table. I attached the cords with the Lark’s head knot. I folded the first 48-inch cord, slipped it under the keychain, looped it over, and yanked the ends through. Did the same thing with the other cords, and voila!
2. Knotting Up the First Row:

Lined up the cords and labeled them in my head from 1 to 6. I worked with cords 1 to 3 and knotted double diagonal half hitch knots around cord 1. Did the same on the right side, this time with cord 6, to get that mermaid tail vibe going.

3. Making More Rows:

Kept on with my pattern, starting each row just like the first. Crisscrossed one cord over the other and tied ’em in two knots. After a bit, I had about 10 rows of these cool diagonal knots.
4. Final Row of Knots:

To wrap things up neatly, I used half hitch knots. On the left, I crossed cord 1 over cord 2, then cords 1 and 3, tying them up. Did the same dance on the right with cords 6 and 5.
5. Locking it Down with a Wrap:

Grabbed that 20-inch cord and bent it into a “J”, leaving a bit hanging. Placed this over my design and wrapped the longer bit around all the cords a few times. Poked the end through the “J” and gave the shorter bit a pull, locking everything in.
6. Giving it That Mermaid Vibe:

Last thing! I cut and shaped the bottom into that mermaid tail design. Trimmed the cords to about 2.5 to 3 inches, frayed each one with a comb, and gave the ends a little snip to get that mermaid tail look.
And bam! My mermaid tail macrame keychain DIY is finished. Every time I check it out, I get those crafty feels and remember how a little cord and some chill time can whip up some magic.
Dive into DIY! Discover our step--step guide on Macrame Coasters with just 2 knots. Read more now!
Why Make Macrame Keychain DIY?
Every so often, I get this urge to dive into a new DIY project. And lately, macrame keychains have been my jam. So, why should you, like yours truly, jump on this macrame keychain DIY bandwagon? Let me break it down:
- Gifts That Show You Care: Picture this: You hand over a custom macrame keychain to your buddy who watched your cat. It’s like a little, “Hey, thanks for not letting my plant die” token.
- The Perfect Little Extra: Housewarming? Birthday? New ride? Or just jazzing up a gift wrap? A handmade macrame keychain adds that crafty sprinkle.
- Make Your Car Key Pop: Handing over your car key to a valet or mechanic? Jazz it up with a stylish macrame touch. It’s like saying, “Yep, that’s my ride” without saying a word.
- A Bit of Bling for Your Things: Ditch that old, boring keychain you’ve had forever. Or hey, slap one of these on your bag and show off a bit.
- Spot Your Bag, No Sweat: Staring at a carousel full of identical bags? Slap on a macrame keychain, and suddenly it’s, “Oh, there’s my suitcase!” Plus, it might be the coolest tag in the crowd.
- Oops-Proof Your Home: Been there, locked myself out. Giving a key to a trusty neighbor? Put it on a macrame keychain. It’s like a little nod saying, “This is the ‘I messed up’ key.”
To wrap it up, diving into macrame keychain DIY is a ticket to unlimited crafty fun. From gifts that scream “thoughtful” to leveling up your accessory game, these keychains do it all.
With the tips and tricks we’ve shared on Linlin Macrame, you’re now equipped to create, care for, and show off your boho-inspired coasters. Embrace the art, and let your creative juices flow!